Recently, I moved a complex Django application, originally developed and tested on a Windows laptop, to a new Ubuntu 24.x Virtual Private Server (VPS) hosted on IONOS.
The Django app is fully operational on the local machine, utilizing an SQLite3 database for its models. For those undertaking a similar migration, here are the steps I followed.
DOMAIN SETUP:
- Log in to your domain registrar (the service where you registered
domain name). - Locate the DNS settings for your domain. This is usually under a section like “DNS Management,” “DNS Settings,” or “Manage DNS.”
Add an A record to point the domain to your server’s IP address (SEE IONOS IMAGE BELOW):
- Type:
A - Name:
@(this represents your root domain,your domain) - Value: Your server’s IP address (e.g.,
your ip) - TTL: Leave this as the default or set it to a low value (e.g., 300 seconds) for quicker propagation.
Add a CNAME record for the www subdomain:
- Type:
CNAME - Name:
www - Value:
your domain - TTL: Default or similar to the A record.
Save the changes.
While DNS Propagates
DNS changes can take anywhere from a few minutes to 24 hours to propagate fully, though it’s often quicker. So, while it’s doing its thing, let’s get the Django app loaded onto the server.
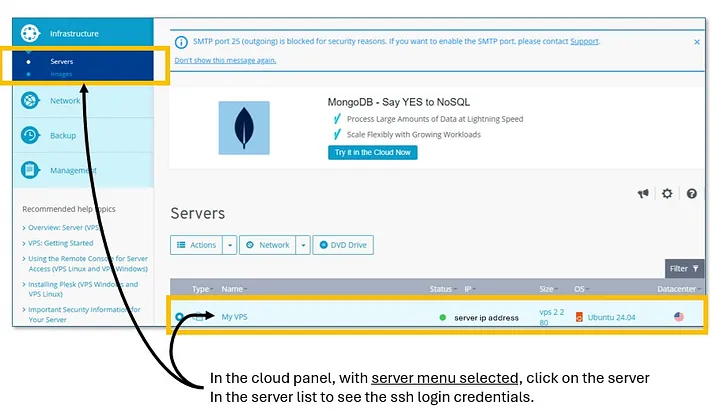
IONOS SSH Credentials
Get the IONOS SSH credentials by visiting the IONOS CLOUD LOGIN. Once logged in, with the Servers menu selected, click the server in the server list and find the password for ssh (see image below).
Next, you will need to connect to the server. You can use either Command Prompt (cmd) or the terminal in Visual Studio Code to SSH into your VPS. I recommend using the (cmd) prompt for the initial commands, later we’ll switch to VS Code’s IDE Terminal. But, for clarity, here’s how to do it with both:
Using Command Prompt (cmd)
Open Command Prompt (in windows search box, type cmd and press return)
Enter the following command:
ssh your_username@your_server_ipReplace your_username with your VPS username and your_server_ip with the IP address of your VPS.
Using Visual Studio Code
Open Visual Studio Code.
Go to the terminal (View > Terminal or use the shortcut `Ctrl + “).
Run the same SSH command:
ssh your_username@your_server_ipNow you should be logged in as root on your server, your next steps are to update the server and install the necessary packages.
Step 1: Update and Upgrade the Server
Run the following command to update the package lists and upgrade installed packages:
sudo apt update && sudo apt upgrade -yThis will ensure that your server is up-to-date with the latest security patches and software updates.
Step 2: Install Python, pip, and Nginx
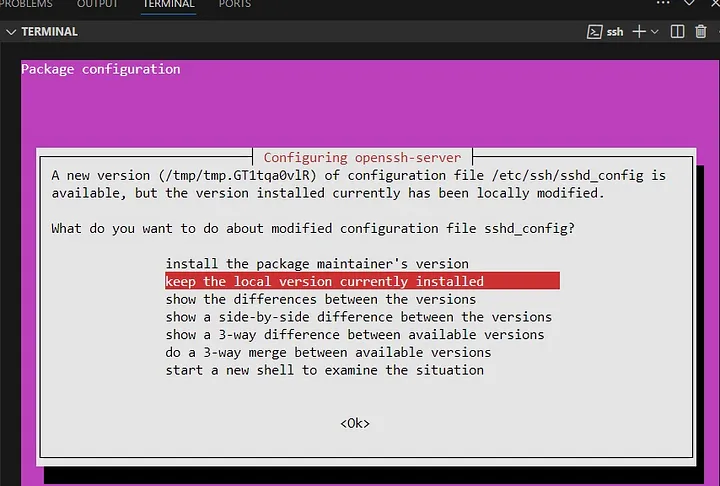
Install Python, pip, and nginx (if they aren’t installed already):
sudo apt install python3 python3-pip python3-venv nginx -yNOTE 1: During the installation process you may get the dialog shown below. For the sshd_config file, it’s usually best to keep the local version currently installed (the highlighted choice).
NOTE 2: After the installs are complete, you may get a warning that looks like this:
Pending kernel upgrade!
Running kernel version:
  6.8.0-31-generic
Diagnostics:
  The currently running kernel version is not the expected kernel version 6.8.0-47-generic.
This indicates the kernel update is pending, which typically requires a system reboot to fully apply.
Reboot the Server: Rebooting will apply the kernel update.
sudo rebootLog Back In: After a minute or so, log back into your server using SSH:
ssh your_username@your_server_ipVerify the kernel update was successful by checking the currently running kernel version.
Run this command to display the kernel version:
uname -rYou should see output that shows the new kernel version. If the update applied correctly, you’ll see 6.8.0-47-generic (or whatever the expected version was from the update message) instead of 6.8.0-31-generic.
Now, the next steps are to transfer the Django project from the laptop to the server.
Step 1: Close All Connections to the Server
If you have any (cmd) windows or VS Code Terminal windows open and connected to the Server, exit them with this command:
exitStep 2: Transfer Your Django Project to the Server
Open a fresh terminal on your laptop.
In most cases, the Django app will be installed in the www folder on the Server. Create that folder on your server by using this command:
mkdir -p /var/www/{project name}/

For example, if the prjoect name is Cat Jokes, then
mkdir -p /var/www/cat_jokes/ NOTE: The -p option ensures that all necessary parent directories are created if they don’t already exist.
To copy files from the local Windows machine to the server, run the scp command directly on your Windows computer (not while logged into the server).
scp -r C:/{project folder} root@xx.xx.xx.xx:/var/www/{project name}/

For example, if the prjoect is in c:/cat_jokes and the project name is cat jokes, then
scp -r C:/cat_jokes root@xx.xx.xx.xx:/var/www/cat_jokes/
SIDE NOTE: It takes time to move the files to the server and I stay away from adding the -C option (scp -C -r ...) which enables compression and can speed up transfers.
While I can’t provide definitive proof, I’ve observed that FileZilla transfers appear faster, in reality, both methods use the SSH protocol and should be similar in transfer speeds. However, FileZilla does have the advantage of being more robust, with better handling of interrupted connections and automatic retries. For this project, however, I chose to proceed with the command-line approach.
ONCE THE FILES TRANSFER…
Log back into your server:
ssh your_username@your_server_ipNavigate to the target directory where you copied the files:
cd /var/www/{project name}/List the contents to confirm the files are there:
ls -RThe -R option lists all files and directories recursively, so you should see the full directory structure of {project name}.
The next step is to set up the virtual environment and install the Django app’s dependencies.
Step 1: Create a Virtual Environment
Navigate to the {project name} directory:
cd /var/www/{project name}Create a virtual environment named venv:
python3 -m venv venvActivate the virtual environment:
source venv/bin/activateStep 2: Install Dependencies
Install the dependencies from your requirements.txt file:
pip install -r requirements.txtThis will install all necessary packages for {project name} to run on the server.
IMPORTANT: WE ARE NOW USING VISUAL STUDIO CODE IDE
Let’s manage the remote server files from VS Code IDE by using the Remote — SSH extension. This allows you to connect to your server directly within VS Code, so you can edit files and run commands as if they were local.
Here’s how to set it up:
Step 1: Install the Remote — SSH Extension
- Open VS Code on your local machine.
- Go to the Extensions view (usually on the left sidebar or by pressing
Ctrl+Shift+X). - Search for Remote — SSH and install it.
Step 2: Connect to Your Server
- Press
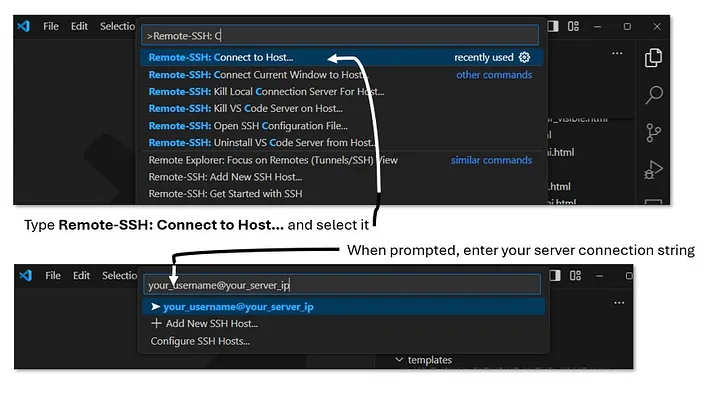
F1(orCtrl+Shift+P) to open the command palette in VS Code. - Type Remote-SSH: Connect to Host… and select it.
- When prompted, enter your server connection string
You should see a dialog at the bottom of the VS Code screen, press the blue (details) button to enter the server password or SSH key passphrase. Also select the Server type (Linux).
NOTE: First use, the Remote-SSH extension will perform background setup and checks on the server. This process can take a few minutes because it’s downloading and configuring files for the first time.
After a few minutes, close the VS Code window and reopen. You should see a request for the password in the F1 input box at the top of the IDE. Enter your password and press return.
Find the “Open Folder” button in VS Code (Explorer Window) and click it then enter your folder:
/var/www/{project name}Finally, close the VS Code window and reopen once more. You should see a request for the password in the F1 input box (press (details) if you do not see the password request). Enter your password and press return and the local VS Code window is connected to the root folder on the server.
Update settings.py for Production
In the VS Code Explorer, navigate to your Django project’s settings.py file (likely at /var/www/{project name}/{project name}/settings.py).
Update the ALLOWED_HOSTS setting to include your domain and server IP:
ALLOWED_HOSTS = ['domain name', 'xx.xx.xx.xx', '127.0.0.1']Save changes.
Collect Static Files
Open the terminal in VS Code (from Terminal > New Terminal).
Activate your virtual environment:
source /var/www/{project name}/venv/bin/activateRun the Django command to collect static files, which are used for serving CSS, JavaScript, images, etc., in production:
python manage.py collectstaticNOTE: If you already have a staticfiles directory, you don’t need to delete it before running python manage.py collectstatic. Running collectstatic will automatically update existing files and add any new ones, so there’s no risk of duplication or redundancy.
Additionally, collectstatic is a good way to ensure all the libraries are installed. Thus, installed any libraries collectstatic notifies is missing.
Once the static files are collected, the next step is to set up Gunicorn, a WSGI server that will serve the Django app in production.
Step 1: Install Gunicorn
With your virtual environment still active, install Gunicorn:
pip install gunicornStep 2: Test Gunicorn
Run Gunicorn to test serving your Django application:
gunicorn --workers 3 {project name}.wsgi:applicationUsually, the requirements text has all of the require modules but if you see traceback errors, then check the last line for something like:
  File "/var/www/{project name}/{project name}/apps/main/views.py", line 36, in <module>
    from googleapiclient.discovery import build
ModuleNotFoundError: No module named 'googleapiclient'
When you find “No module” errors, install those modules and the errors should clear.
Continue to run: gunicorn — workers 3 {project name}.wsgi:application command until the application runs. You will see an option to open the app in your local browser, select that option and the index will open without css styling.
Steps to Finalize Deployment
Configure Gunicorn as a Daemon: Since we tested Gunicorn, let’s make sure it’s configured to start automatically and run in the background as a service.
If you haven’t already, create and configure a Gunicorn service file:
sudo nano /etc/systemd/system/gunicorn.serviceAdd the following (update paths as necessary):
[Unit]
Description=gunicorn daemon for {project name}
After=network.target

[Service]
User=root
Group=www-data
WorkingDirectory=/var/www/{project name}/{project name}
ExecStart=/var/www/{project name}/venv/bin/gunicorn --workers 3 --bind unix:/var/www/{project name}/{project name}.sock {project name}.wsgi:application

[Install]
WantedBy=multi-user.target
To save and exit the gunicorn.service file in nano:
- Press
Ctrl + O(Write Out) to save the file. - Press
Enterto confirm the filename. - Press
Ctrl + Xto exit the editor.
Enable and start the service:
sudo systemctl enable gunicorn
sudo systemctl start gunicorn
Set Up Nginx as a Reverse Proxy: To handle external requests and serve static files, we’ll set up Nginx as a reverse proxy.
Create an Nginx config file for {project name}:
sudo nano /etc/nginx/sites-available/{project name}Add the following configuration (replace {domain name}with your domain):
server {
    listen 80;
    server_name {domain name} www.{domain name};

    location / {
        include proxy_params;
        proxy_pass http://unix:/var/www/{project name}/{project name}.sock;
    }

    location /static/ {
        alias /var/www/{project name}/staticfiles/;
    }
}
IMPORTANT NOTE ABOUT gunicorn.service
To get Gunicorn running successfully for the Django application, first set up the gunicorn.service configuration file. This file, located at /etc/systemd/system/gunicorn.service, defines the Gunicorn service settings, including the WorkingDirectory (the project directory), ExecStart (the command to start Gunicorn with the specified socket and module), and relevant User and Group permissions. Once the service file is configured correctly, run the following commands:
sudo systemctl daemon-reload
sudo systemctl restart gunicorn
sudo systemctl status gunicorn
These commands reload the systemd daemon to apply changes, restart Gunicorn, and display its current status to verify successful operation. For troubleshooting, examine the output of sudo journalctl -u gunicorn.service -n 50 --no-pager to identify errors, such as misconfigured paths or missing modules. Verify yourWorkingDirectory in Gunicorn points to the right WSGI module ({project name}.wsgi:application) are key steps to resolving common issues.
SSL (Secure Sockets Layer) from the Electronic Frontier Foundation (EFF)
Check your domain and see if domain propagation has completed. When ready, Secure the Site with SSL (Optional but Recommended):
Use Let’s Encrypt to enable HTTPS:
sudo apt install certbot python3-certbot-nginx
sudo certbot --nginx -d {your domain} -d www.{your domain}
Follow the prompts in the terminal to complete the SSL setup — the usual proceed prompts include SSL agreement, valid email and do you want email updates.
(venv) root@ubuntu:/etc# sudo nano /etc/systemd/system/gunicorn.service
(venv) root@ubuntu:/etc# sudo apt install certbot python3-certbot-nginx
Reading package lists... Done
Building dependency tree... Done
Reading state information... Done
certbot is already the newest version (2.9.0-1).
python3-certbot-nginx is already the newest version (2.9.0-1).
0 upgraded, 0 newly installed, 0 to remove and 2 not upgraded.
(venv) root@ubuntu:/etc# sudo certbot --nginx -d {your domain name} -d www.{your domain name}
Saving debug log to /var/log/letsencrypt/letsencrypt.log
Requesting a certificate for {your domain name} and www.{your domain name}

Successfully received certificate.
Certificate is saved at: /etc/letsencrypt/live/{your domain name}/fullchain.pem
Key is saved at:         /etc/letsencrypt/live/{your domain name}/privkey.pem
This certificate expires on 2025-01-24.
These files will be updated when the certificate renews.
Certbot has set up a scheduled task to automatically renew this certificate in the background.

Deploying certificate
Successfully deployed certificate for {your domain name} to /etc/nginx/sites-enabled/{project name}
Successfully deployed certificate for www.{your domain name} to /etc/nginx/sites-enabled/{project name}
Congratulations! You have successfully enabled HTTPS on https://{your domain name} and https://www.{your domain name}
PRODUCTION DATABASE
As mentioned at the beginning of this article, Sqlite3 is used on the local computer. On the server we’ll need a production database. Django applications typically use PostgreSQL in production.
Install the Database Software
If you’re using PostgreSQL (recommended for Django projects), install it with:
sudo apt update
sudo apt install postgresql postgresql-contrib
Set Up a Database and User for Django:
PostgreSQL:
- Log into the PostgreSQL shell as the
postgresuser:
sudo apt install postgresql postgresql-contrib- Enter the Postgres shell:
sudo -u postgres psql- Create a new database and user:
-- 1. Create the database
CREATE DATABASE {projectname}_db;

-- 2. Create a new user with a password
CREATE USER {projectname}_admin_user WITH PASSWORD 'your_STRONG_secure_password';

-- 3. Configure the user’s settings
ALTER ROLE {projectname}_admin_user SET client_encoding TO 'utf8';
ALTER ROLE {projectname}_admin_user SET default_transaction_isolation TO 'read committed';
ALTER ROLE {projectname}_admin_user SET timezone TO 'UTC';

-- 4. Grant the user full privileges on the database
GRANT ALL PRIVILEGES ON DATABASE {projectname}_db TO {projectname}_admin_user;

-- 5. Switch to the new database
\c {projectname}_db;

-- 6. Grant full privileges on the public schema to the user
GRANT ALL PRIVILEGES ON SCHEMA public TO {projectname}_admin_user;

-- 7. Set default privileges so that future tables, sequences, and functions in public schema will grant full access to the user
ALTER DEFAULT PRIVILEGES IN SCHEMA public GRANT ALL ON TABLES TO {projectname}_admin_user;
ALTER DEFAULT PRIVILEGES IN SCHEMA public GRANT ALL ON SEQUENCES TO {projectname}_admin_user;
ALTER DEFAULT PRIVILEGES IN SCHEMA public GRANT ALL ON FUNCTIONS TO {projectname}_admin_user;

-- 8. Exit psql
\q
Configure Django to Use the Production Database
In your Django project settings (e.g., settings.py), update the DATABASES setting to reflect the new database:
DATABASES = {
    'default': {
        'ENGINE': 'django.db.backends.postgresql',
        'NAME': '{projectname}_db',
        'USER': '{projectname}_admin_user',
        'PASSWORD': 'your_STRONG_secure_password',
        'HOST': 'localhost',
        'PORT': '5432',
    }
}
Install the PostgreSQL adapter:
source /var/www/{projectname}/venv/bin/activate
pip install psycopg2-binary
Connecting to the database
To allow {projectname}_admin_user to connect via password rather than peer or scram-sha-256 authentication, set the following settings:
- Update the local access method for all users, including
{projectname}_admin_user, to usemd5if you want password-based access. - To specify access for a specific user (
{projectname}_admin_user), add a line explicitly for that user.
You can modify the configuration like this:
sudo nano /etc/postgresql/16/main/pg_hba.confNOTE: In the path above, /16/ is the version (psql — version command will show which version is installed).
Scroll down and find the local settings (see below)
# Database administrative login by Unix domain socket
local   all             postgres                                peer

# TYPE  DATABASE        USER                 ADDRESS                 METHOD

# "local" is for Unix domain socket connections only
local   all             all                                      all
# IPv4 local connections for all users:
host    all             all                  127.0.0.1/32            scram-sha-256
# IPv6 local connections for all users:
host    all             all                  ::1/128                 scram-sha-256
Change local MEHTODS to md5:
# Database administrative login by Unix domain socket
local   all             postgres                                peer

# TYPE  DATABASE        USER                 ADDRESS                 METHOD

# "local" is for Unix domain socket connections only
local   all             all                                      md5
# Allow the specific user {projectname}_admin_user to authenticate using md5
host    all             {projectname}_admin_user   127.0.0.1/32            md5
host    all             {projectname}_admin_user   ::1/128                 md5

# IPv4 local connections for all users:
host    all             all                  127.0.0.1/32            scram-sha-256
# IPv6 local connections for all users:
host    all             all                  ::1/128                 scram-sha-256
After the update, restart the database:
sudo systemctl restart postgresqlLog into the database using your new admin_user account
psql -U {projectname}_admin_user -d {projectname}_dbIn the Postgre shell, open the database:
\c {projectname}_dbEnter \q to exit the database shell:
\qNOTE: Sometimes, even if privileges are set when creating the database and user, you may still need to reassign them. If you encounter an error when running python manage.py migrate, it likely indicates that additional privileges are required. In that case, apply the privileges as shown below, then enter \q to exit the database shell.
GRANT ALL PRIVILEGES ON SCHEMA public TO {projectname}_admin_user;
GRANT ALL PRIVILEGES ON ALL TABLES IN SCHEMA public TO {projectname}_admin_user;
GRANT ALL PRIVILEGES ON ALL SEQUENCES IN SCHEMA public TO {projectname}_admin_user;
ALTER DEFAULT PRIVILEGES IN SCHEMA public GRANT ALL ON TABLES TO {projectname}_admin_user;
ALTER DEFAULT PRIVILEGES IN SCHEMA public GRANT ALL ON SEQUENCES TO {projectname}_admin_user;
ALTER DEFAULT PRIVILEGES IN SCHEMA public GRANT ALL ON FUNCTIONS TO {projectname}_admin_user;
Apply Database Migrations
Once the database configuration is set up, apply Django’s migrations to create the necessary tables:
python manage.py migrateTest the Database Connection
To ensure everything is connected correctly, you can run:
python manage.py dbshellIf you connect to the database shell without errors, the database setup is complete.
Create a Superuser (Optional)
If you haven’t already created an admin user, you can do so:
python manage.py createsuperuserWith the database configured and migrations applied, your Django app is ready to work with the production database. From here, you can focus on configuring any additional production settings, like setting up email, monitoring, and security settings (e.g., configuring HTTPS).
EMAIL SETUP
The IONOS account holder has (2) basic email addresses available here Email | IONOS Package Selection. I think the emails came with the domain purchase.
Email setup on the IONOS website is straight forward. First, I created an email address for support (support@{domain name}) to handle notifications, registration, password resets, etc. Then I created a second email address for billing (billing@{domain name}).
Visit this IONIS Email Account link to see the email server information needed for the Django app.
Next, we need to configure these email addresses in the Django settings so the app can send emails using the IONOS Mail Basic accounts.
Step 1: Add Email Settings to Django
- Open your Django settings file (
settings.py).
2. Add the following settings using support@{domain name} (as it’s the address for notifications and account-related emails):
EMAIL_BACKEND = 'django.core.mail.backends.smtp.EmailBackend'
EMAIL_HOST = 'smtp.ionos.com'  # IONOS SMTP server
EMAIL_PORT = 587  # IONOS recommended port
EMAIL_USE_TLS = True
EMAIL_HOST_USER = 'support@{domain name}'
EMAIL_HOST_PASSWORD = 'your_STRONG_password'  # Replace with the actual password
DEFAULT_FROM_EMAIL = EMAIL_HOST_USER
3. Save the file.
Step 2: Test Email Configuration
To test your setup:
- Open your Django shell:
python manage.py shell2. Run a test email:
from django.core.mail import send_mail
send_mail(
    'Test Email',
    'This is a test email from {project name}.',
    'support@{domain name}',  # From email
    ['your_email@example.com'],  # Replace with a test recipient email
    fail_silently=False,
)
3. You should receive the test email. If successful, then consolidate the code for both emails as follows:
# General email settings
EMAIL_BACKEND = 'django.core.mail.backends.smtp.EmailBackend'
EMAIL_HOST = 'smtp.ionos.com'  # IONOS SMTP server
EMAIL_PORT = 587
EMAIL_USE_TLS = True

# Default email credentials (e.g., for general notifications)
EMAIL_HOST_USER = 'support@{domain name}'
EMAIL_HOST_PASSWORD = 'your_STRONG_password'
DEFAULT_FROM_EMAIL = EMAIL_HOST_USER

# Billing email credentials (for billing-specific emails)
BILLING_EMAIL_HOST_USER = 'billing@{domain name}'
BILLING_EMAIL_HOST_PASSWORD = 'your_STRONG_password'
The Webmail Login is located https://id.ionos.com/identifier?login_hint=billing@{domain name}
And the client is here: https://email.ionos.com/appsuite/
Usage in Views or Functions
In your views or functions, you can specify the sender email dynamically based on the context. Here’s an example:
from django.core.mail import send_mail
from django.conf import settings

def send_billing_email():
    send_mail(
        'Invoice',
        'Your invoice details...',
        settings.BILLING_EMAIL_HOST_USER,
        ['recipient@example.com'],
        fail_silently=False,
        auth_user=settings.BILLING_EMAIL_HOST_USER,
        auth_password=settings.BILLING_EMAIL_HOST_PASSWORD,
    )

def send_support_email():
    send_mail(
        'Support Ticket',
        'Your support message...',
        settings.EMAIL_HOST_USER,  # Default 'support@{domain name}' email
        ['recipient@example.com'],
        fail_silently=False,
    )
This setup allows you to control which email credentials are used based on the type of email being sent.
Next Logical Step…
The next step is to integrate Django’s authentication system with email: particularly tasks like basic user registration and more advanced features such as email confirmation links. These functionalities are complex, require careful configuration of Django’s built-in authentication and email modules to ensure account security and smooth onboarding.
Given the scope and complexity, including setup, email server configurations, and confirmation workflows, this topic is quite extensive and is better approached in its own detailed article.
Thank you for following along with this tutorial. We hope you found it helpful and informative. If you have any questions, or if you would like to suggest new Python code examples or topics for future tutorials/articles, please feel free to join and comment. Your feedback and suggestions are always welcome!
You can find the same tutorial on Medium.com.