Guide on building a Python desktop application using the CoreUI Bootstrap 5 dark theme. We’ll walk you through:
- Setting up your project directory and virtual environment.
- Installing the CoreUI free admin template using npm.
- Building the CoreUI template for production.
- Using Python scripts to organize the build output and update templates.
- Creating the
app.pyfile for your Flask application. - Integrating the CoreUI template into your Flask app.
- Displaying the application in a native window using PyWebView.
- Troubleshooting common issues and applying necessary fixes.
In the end, you’ll have a functional desktop application showcasing the CoreUI Bootstrap 5 dark theme within a PyWebView window.
Prerequisites
- Python 3.6+ installed on your system.
- Node.js and npm installed (for building the CoreUI template).
- Basic knowledge of Python and web development (HTML, CSS).
- pip package manager (comes with Python).
- Git installed (for cloning repositories).
- For Windows users: familiarity with Command Prompt or PowerShell.
Step 1: Setting Up Your Project Directory and Virtual Environment
1.1 Create a Project Directory
Open your terminal or command prompt and create a new directory for your project.
For Windows PowerShell:
# Create the project directory
New-Item -ItemType Directory -Name coreui_pywebview_app

# Navigate into the project directory
Set-Location coreui_pywebview_app
For VS Code Windows/Unix/macOS Terminal:
# Create the project directory
mkdir coreui_pywebview_app

# Navigate into the project directory
cd coreui_pywebview_app
1.2 Set Up a Python Virtual Environment
Creating a virtual environment helps isolate project dependencies.
For Windows PowerShell:
python -m venv venv
.\venv\Scripts\Activate.ps1
For Unix/macOS Terminal:
python3 -m venv venv
source venv/bin/activate
1.3 Install Required Python Packages
Install Flask for the backend server and PyWebView to display the web content in a desktop window.
pip install Flask pywebviewStep 2: Installing and Building the CoreUI Template
2.1 Install Node.js and npm
If you haven’t installed Node.js and npm, download and install them from the official website.
Here’s how to install them on your system:
For Windows:
Download the Installer:
- Visit the official Node.js download page.
- Click on the Windows Installer (.msi) link for the LTS version (recommended for most users).
Run the Installer:
- Locate the downloaded
.msifile in yourDownloadsfolder. - Double-click the installer to start the installation process.
Follow the Installation Wizard:
- Click Next on the welcome screen.
- Read and accept the license agreement by checking the box and clicking Next.
- Choose the destination folder or leave it as default, then click Next.
- On the Custom Setup screen, ensure all components are selected (the default selection is recommended), then click Next.
- Optionally, you can adjust settings such as adding Node.js to your
PATHenvironment variable (enabled by default). - Click Install to begin the installation.
- If prompted by User Account Control, click Yes to allow the installation.
- Once the installation is complete, click Finish.
Verify the Installation:
- Open Command Prompt or PowerShell.
- Run the following commands to verify that Node.js and npm are installed:
node -v
npm -v
The commands should display the installed versions, for example:
v18.18.2
9.8.1
For macOS:
Download the Installer:
- Go to the official Node.js download page.
- Click on the macOS Installer (.pkg) link for the LTS version.
Run the Installer:
- Locate the downloaded
.pkgfile in yourDownloadsfolder. - Double-click the installer to launch it.
Follow the Installation Steps:
- Click Continue on the introduction screen.
- Read the license agreement, click Continue, and then Agree.
- Select the destination disk for the installation and click Continue.
- Click Install to begin the installation.
- You may be prompted to enter your administrator password; enter it and click Install Software.
- After the installation completes, click Close.
Verify the Installation:
- Open Terminal (you can find it in Applications > Utilities).
- Run the following commands:
node -v
npm -v
The commands should display the installed versions.
2.2 Clone the CoreUI Repository
From within your project directory (coreui_pywebview_app), clone the CoreUI repository.
Using Git:
# Clone the CoreUI repository into a subdirectory
git clone https://github.com/coreui/coreui-free-bootstrap-admin-template.git coreui-template
If you don’t have Git installed, you can download the ZIP file from the CoreUI GitHub repository and extract it into a directory named coreui-template inside your project directory.
2.3 Install Dependencies
Navigate into the coreui-template directory and install the project’s dependencies using npm.
# Navigate into the CoreUI template directory
cd coreui-template

# Install dependencies
npm install
This command reads the package.json file and installs all necessary packages into the node_modules directory.
2.4 Build the CoreUI Template
To build the template for production (minified and optimized):
# Build for production
npm run build
This command compiles the SCSS files into CSS, bundles JavaScript files, and outputs the compiled assets into the dist directory.
2.5 Verify the Build Output
After the build process completes, you should see a dist directory inside coreui-template containing the compiled HTML, CSS, and JS files.
coreui-template/
├── dist/
│   ├── index.html
│   ├── base/
│   │   ├── accordion.html
│   │   ├── breadcrumb.html
│   │   └── [...]
│   ├── buttons/
│   │   ├── buttons.html
│   │   ├── button-group.html
│   │   └── [...]
│   ├── assets/
│   ├── css/
│   ├── js/
│   └── vendors/
├── node_modules/
├── src/
├── package.json
└── [other files]...
...
Step 3: Using Python Scripts to Organize the Build Output
To automate the process of moving and updating the necessary files from the dist directory to the appropriate locations in our Flask application, we’ll use two Python scripts:
copy_files.py: Copies the compiled assets to thetemplatesandstaticdirectories.update_templates.py: Updates the HTML templates to correctly reference static files and routes.
3.1 Create the copy_files.py Script
Create a new file named copy_files.py in your project root directory (coreui_pywebview_app) and paste the following code.
# copy_files.py

import os
import shutil

def copy_files():
    # Define the paths
    project_root = os.getcwd()
    coreui_dist = os.path.join(project_root, 'coreui-template', 'dist')
    templates_dir = os.path.join(project_root, 'templates')
    static_dir = os.path.join(project_root, 'static')

    # Ensure the source directory exists
    if not os.path.exists(coreui_dist):
        print(f"Source directory does not exist: {coreui_dist}")
        return

    # Create 'templates' and 'static' directories if they don't exist
    os.makedirs(templates_dir, exist_ok=True)
    os.makedirs(static_dir, exist_ok=True)

    # Copy HTML files and directories to 'templates' directory
    for item in os.listdir(coreui_dist):
        src_path = os.path.join(coreui_dist, item)
        dst_path = os.path.join(templates_dir, item)
        if os.path.isfile(src_path) and src_path.endswith('.html'):
            shutil.copy2(src_path, dst_path)
            print(f"Copied file {src_path} to {dst_path}")
        elif os.path.isdir(src_path):
            if item not in ['assets', 'css', 'js', 'vendors']:
                # Copy the directory to templates
                if os.path.exists(dst_path):
                    shutil.rmtree(dst_path)
                    print(f"Removed existing directory: {dst_path}")
                shutil.copytree(src_path, dst_path)
                print(f"Copied directory {src_path} to {dst_path}")

    # List of asset directories to copy to static
    asset_dirs = ['assets', 'css', 'js', 'vendors']

    for asset_dir in asset_dirs:
        src_dir = os.path.join(coreui_dist, asset_dir)
        dst_dir = os.path.join(static_dir, asset_dir)

        if os.path.exists(src_dir):
            # Remove the destination directory if it already exists
            if os.path.exists(dst_dir):
                shutil.rmtree(dst_dir)
                print(f"Removed existing directory: {dst_dir}")

            # Copy the directory
            shutil.copytree(src_dir, dst_dir)
            print(f"Copied {src_dir} to {dst_dir}")
        else:
            print(f"Source directory does not exist: {src_dir}")

if __name__ == '__main__':
    copy_files()
Explanation:
- The script copies all
.htmlfiles and subdirectories (excludingassets,css,js,vendors) fromcoreui-template/distto thetemplatesdirectory. - It copies the asset directories (
assets,css,js,vendors) to thestaticdirectory. - Existing directories in the destination are removed before copying to avoid conflicts.
3.2 Run the copy_files.py Script
Ensure your virtual environment is activated and run the script.
python copy_files.pyExpected Output:
Copied file /path/to/coreui-template/dist/index.html to /path/to/templates/index.html
Copied directory /path/to/coreui-template/dist/base to /path/to/templates/base
Copied directory /path/to/coreui-template/dist/buttons to /path/to/templates/buttons
[...]
Copied /path/to/coreui-template/dist/assets to /path/to/static/assets
Copied /path/to/coreui-template/dist/css to /path/to/static/css
Copied /path/to/coreui-template/dist/js to /path/to/static/js
Copied /path/to/coreui-template/dist/vendors to /path/to/static/vendors
3.3 Create the update_templates.py Script
Create a new file named update_templates.py in your project root directory and paste the following code.
# update_templates.py

import os
import re

def update_template(file_path):
    with open(file_path, 'r', encoding='utf-8') as f:
        content = f.read()

    # Regular expression to find src, href, and xlink:href attributes pointing to static files
    pattern = re.compile(r'''(?P<attr>(src|href|xlink:href))=(["'])(?!\{\{)(?!https?:\/\/)(?!\/\/)(?P<path>[^"'>{%][^"']*)\3''')

    def replace_match(match):
        attr = match.group('attr')
        quote = match.group(3)
        path = match.group('path')

        # Skip if already using url_for
        if '{{ url_for' in path:
            return match.group(0)

        # Skip placeholders and special schemes
        if path.startswith(('#', 'javascript:', 'mailto:', 'tel:')):
            return match.group(0)

        # Handle fragment identifiers in path
        if '#' in path:
            path, fragment = path.split('#', 1)
            fragment = '#' + fragment
        else:
            fragment = ''

        # Handle .html files differently
        if path.endswith('.html'):
            # If path is 'index.html' or './' or 'index', use url_for('index')
            if path in ('index.html', './', 'index'):
                new_path = "{{ url_for('index') }}"
            else:
                # Use url_for('serve_page', path='...') for other .html files
                new_path = "{{ url_for('serve_page', path='%s') }}" % path
        else:
            # For static files, use url_for('static', filename='...')
            new_path = "{{ url_for('static', filename='%s') }}" % path.replace('\\', '/')

        # Reconstruct the attribute with the new path and any fragment
        return '%s=%s%s%s%s' % (attr, quote, new_path, fragment, quote)

    new_content, count = pattern.subn(replace_match, content)

    if count > 0:
        with open(file_path, 'w', encoding='utf-8') as f:
            f.write(new_content)
        print(f"Updated {file_path} with {count} replacements.")
    else:
        print(f"No replacements needed in {file_path}.")

def main():
    templates_dir = 'templates'

    # Walk through the templates directory recursively
    for root, dirs, files in os.walk(templates_dir):
        for file in files:
            if file.endswith('.html'):
                file_path = os.path.join(root, file)
                update_template(file_path)

if __name__ == '__main__':
        main()
Explanation:
- The script updates all HTML files in the
templatesdirectory and its subdirectories. - It uses a regular expression to find all
srcandhrefattributes. - For static files (CSS, JS, images), it wraps the paths with
{{ url_for('static', filename='...') }}. - For links to other HTML templates, it adjusts the
hrefattributes to use Flask routing: index.htmllinks are replaced with{{ url_for('index') }}.- Other
.htmlfiles are linked using{{ url_for('serve_page', path='filename.html') }}. - The script avoids modifying
data-*attributes to prevent JavaScript issues.
3.4 Run the update_templates.py Script
Run the script.
python update_templates.pyExpected Output:
Updated templates/index.html with 25 replacements.
Updated templates/base/accordion.html with 10 replacements.
Updated templates/buttons/buttons.html with 15 replacements.
[...]
3.5 Verify the Files Have Been Updated
Your project structure should now look like this:
coreui_pywebview_app/
├── app.py
├── copy_files.py
├── update_templates.py
├── templates/
│   ├── index.html
│   ├── base/
│   │   ├── accordion.html
│   │   ├── breadcrumb.html
│   │   └── [...]
│   ├── buttons/
│   │   ├── buttons.html
│   │   ├── button-group.html
│   │   └── [...]
│   └── [other HTML files and directories]
├── static/
│   ├── assets/
│   ├── css/
│   ├── js/
│   └── vendors/
├── coreui-template/
└── venv/
Open one of the HTML files (e.g., templates/index.html) and verify that the static file paths and links have been updated.
Example of Updated HTML:
<link rel="stylesheet" href="{{ url_for('static', filename='css/style.css') }}">
<a class="nav-link" href="{{ url_for('index') }}">Home</a>
<a class="nav-link" href="{{ url_for('serve_page', path='colors.html') }}">Colors</a>
<a class="nav-link" href="{{ url_for('serve_page', path='base/accordion.html') }}">Accordion</a>
Step 5: Creating the app.py File
Create a file named app.py in your project root directory with the following content.
# app.py

from flask import Flask, render_template
import threading
import webview

app = Flask(__name__)

@app.route('/')
def index():
    return render_template('index.html')

# Add routes for other pages
@app.route('/<path:path>')
def serve_page(path):
    try:
        return render_template(path)
    except:
        return render_template('404.html'), 404

def start_server():
    app.run(host='127.0.0.1', port=5000, debug=False)

if __name__ == '__main__':
    # Start the Flask server in a separate thread
    server = threading.Thread(target=start_server)
    server.daemon = True
    server.start()

    # Create a PyWebView window and load the Flask app
    window = webview.create_window('CoreUI Python App', 'http://127.0.0.1:5000', width=1024, height=768)

    # Start the PyWebView application with debug mode enabled
    webview.start(debug=True)
Explanation:
- Flask Application Setup: We create a basic Flask app with routes corresponding to the pages in the CoreUI template.
- PyWebView Integration: We use PyWebView to create a native window that loads the Flask app.
- Error Handling: The
serve_pageroute attempts to render the requested template and returns a 404 page if the template is not found.
Step 6: Running the Application
6.1 Ensure Virtual Environment is Activated
Make sure your virtual environment is activated.
For Windows PowerShell:
<br>.\venv\Scripts\Activate.ps1For Unix/macOS Terminal:
source venv/bin/activate6.2 Start the Application
Run the app.py script.
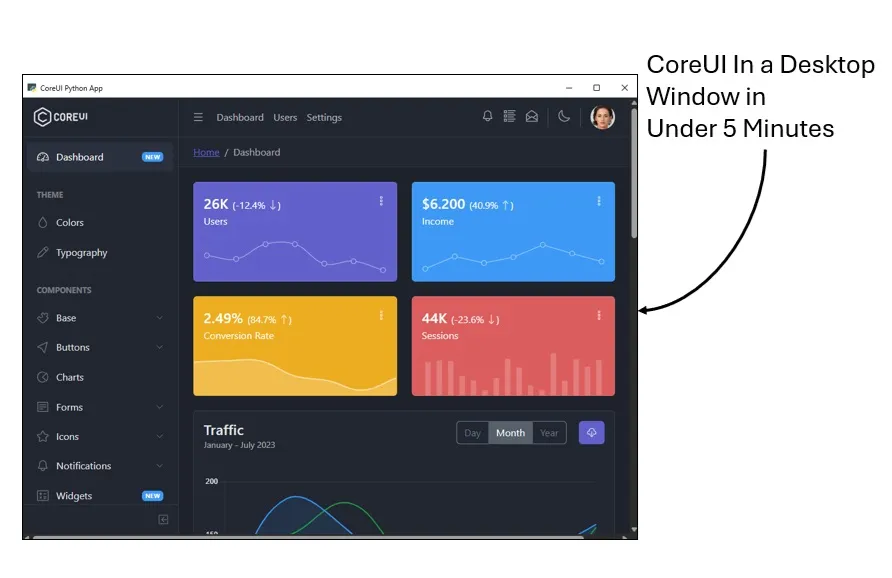
python app.py6.3 View the Application
A PyWebView window should open displaying your Flask application styled with the CoreUI Bootstrap 5 dark theme.
Test the Sidebar Links:
- Click on “Dashboard”, “Colors”, and “Typography” to verify they work.
- Expand the “Base” and “Buttons” menu items and click on sub-items like “Accordion” and “Buttons”.
- Ensure that pages load without 404 errors.
NOTE: Enabling the debug mode in your app.py by setting debug=True in the webview.start() function allows the right-click context menu and browser developer tools within the PyWebView window. This feature lets users access the standard browser right-click menu, which includes navigation options like the back button.
If you wish to disable this feature to prevent access to the developer tools and the right-click menu, you can comment out or remove the debug=True parameter in your app.py. Simply modify the webview.start() function call to exclude the debug parameter:
# Start the PyWebView application without debug mode
webview.start()
By doing this, the application will run without the right-click context menu and developer tools, providing a more controlled environment.
Step 7: Troubleshooting Common Issues
Issue: 404 Errors When Clicking on Sidebar Links
Symptoms:
- Clicking on items like “Base” and “Buttons” results in 404 errors.
- Subpages like
base/accordion.htmlare not found.
Cause:
- Templates for subpages are missing from the
templatesdirectory. - The
update_templates.pyscript didn’t process subdirectories.
Solution:
- Update
copy_files.pyandupdate_templates.pyscripts as shown above to handle subdirectories and recursively process HTML files. - Remove or correct the
<base>tag inindex.htmlto avoid path resolution issues.
Issue: Incorrect Modification of data-* Attributes
Symptoms:
- JavaScript functionality is broken.
- Dropdowns and modals do not work.
Cause:
- The
update_templates.pyscript incorrectly modifieddata-*attributes.
Solution:
- Update
update_templates.pyto avoid modifyingdata-*attributes. - Manually correct any
data-*attributes in your templates.
Issue: Static Files Not Loading
Symptoms:
- Stylesheets and scripts are not being applied.
- The application appears unstyled.
Solution:
- Verify that all static file paths in your HTML templates use the
url_for('static', filename='...')function. - Ensure that the
staticdirectory contains all necessary assets copied from the CoreUIdistdirectory. - Check that the directory structure in
staticmatches the paths specified in the HTML files. - Clear your browser cache or use an incognito/private window.
Thank you for following along with this tutorial. We hope you found it helpful and informative. If you have any questions, or if you would like to suggest new Python code examples or topics for future tutorials/articles, please feel free to join and comment. Your feedback and suggestions are always welcome!
You can find the same tutorial on Medium.com.