Back in the day, the primary interface to telecom, networking, and various other systems was a console terminal with ANSI drawn windows. These terminals used ANSI escape codes to create windows, allowing users to interact with the system through text-based menus.
Today, graphical user interfaces (GUIs) are the norm, providing visually appealing and user-friendly ways to enter commands and manage systems. However, many legacy systems still rely on the console terminal for critical operations and maintenance. ANSI escape codes remain a crucial part of these interactions, enabling complex text formatting and control within the terminal.
Parsing and processing text files containing these ANSI escape characters using Python can help automate tasks, analyze terminal outputs, and capture data. This article will explore the basics of ANSI escape codes and outline a general approach to handling such data using Python.
Example: Drawing a Basic Window
Let’s examine the basic window below, which demonstrates how ANSI escape codes draw a simple rectangular window with the title ‘maintenance’:
[2J [H [K+------------------+ [B [K| [7m maintenance [0m| [B [K| | [B [K| | [B [K| | [B [K+------------------+When rendered in a terminal, the window will look like this:
+------------------+
|   maintenance    |
|                  |
|                  |
|                  |
+------------------+
Explanation:
[2J: Clears the entire screen.[H: Moves the cursor to the home position (top-left corner).[K: Clears from the cursor to the end of the line.+------------------+: Draws the top border of the rectangle.[B: Moves the cursor down one line.| [7m maintenance [0m|: Draws the title row and then resets the text formatting.| |: Draws an empty row inside the rectangle (repeated three times).+------------------+: Draws the bottom border of the rectangle.
Essentially, ANSI escape codes are often used to draw static windows and other graphical elements in a terminal by manipulating the cursor position and using specific characters to create the appearance of borders, titles, and other elements. These codes operate on a grid of defined columns and rows, allowing for precise control over where text and graphical elements are placed on the screen.
ANSI Escape Codes Variations:
Different systems use various ANSI escape codes to draw windows and manage text-based interfaces. While these codes can seem complex, there are clear-cut rules and patterns to help understand them. Here are the key principles to follow.
Understanding ANSI Escape Codes
Escape Character (ESC):
- All ANSI escape codes start with the escape character ESC, represented as
\x1b, or\e, or\033in text. This signals the terminal that a command sequence is beginning.
Control Sequence Introducer (CSI):
- Following the escape character, the sequence typically includes a control sequence introducer, which is
[. The combination of ESC and[([) starts most ANSI escape codes.
Parameters:
- Parameters are optional numeric values separated by semicolons (
;). These numbers modify the behavior of the command. For example,[31mchanges the text color to red. - A missing parameter often implies a default value. For example,
[mis equivalent to[0mand resets text formatting.
Command Character:
The command character specifies the action to be taken. Common command characters include:
A: Move cursor upB: Move cursor downC: Move cursor forward (right)D: Move cursor backward (left)H: Move cursor to specified position (home)J: Clear part of the screenK: Clear part of the linem: Set graphic rendition (text formatting)
Combining Sequences:
- Multiple ANSI codes can be combined in a single escape sequence to perform complex actions. For example,
[1;31msets the text to bold and red.
Common ANSI Escape Sequences
Cursor Movement:
[<n>A: Move cursor up bynlines.[<n>B: Move cursor down bynlines.[<n>C: Move cursor forward (right) byncharacters.[<n>D: Move cursor backward (left) byncharacters.[Hor[;H: Move cursor to the home position (top-left corner).[<n>;<m>H: Move cursor to rown, columnm.
Screen and Line Clearing:
[J: Clear from the cursor to the end of the screen.[1J: Clear from the cursor to the beginning of the screen.[2J: Clear the entire screen.[K: Clear from the cursor to the end of the line.[1K: Clear from the cursor to the beginning of the line.[2K: Clear the entire line.
Text Formatting:
[m: Reset all text formatting.[1m: Set text to bold.[4m: Set text to underline.[7m: Set text to reverse video (swap foreground and background colors).[30mto[37m: Set text color (black, red, green, yellow, blue, magenta, cyan, white).[40mto[47m: Set background color (black, red, green, yellow, blue, magenta, cyan, white).
Reading and Understanding ANSI Codes
Identify the Escape Sequence:
- Look for sequences starting with
[.
Parse the Parameters:
- Note any numeric parameters separated by semicolons. These modify the command’s behavior.
Determine the Command:
- Identify the command character at the end of the sequence to understand the action being performed.
Apply Context:
- Consider the sequence’s context within the text. For example,
[31mchanges text color, while[2Jclears the screen.
Great Collection of ANSI Escape Codes
Everything you never wanted to know about ANSI escape codes |
https://notes.burke.libbey.me/ansi-escape-codes/
Real-life Example
In the image below, there are numerous hidden ANSI codes. The code displays the system’s data in an easily readable format. If you were to dump the above window into a text file you would see the visual window ‘drawn’ using a series of ANSI codes.
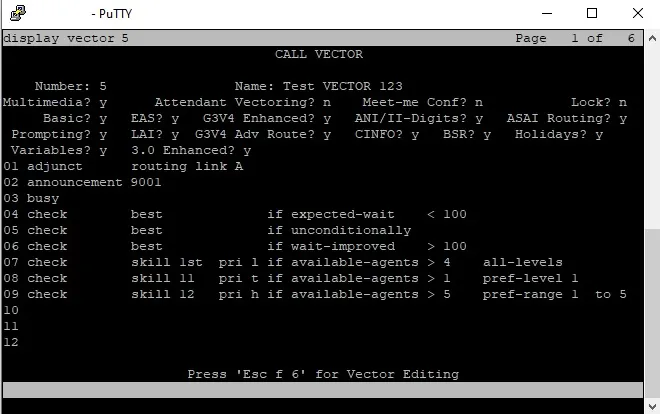
The ANSI code block below shows the window’s ANSI codes.
[0m [23;0H [24;0H [K [1;0H [0;7m Note that “display vector 5” is prefixed with [1;1H where [1;1H = row 1, column 1.
Likewise, [4;5HNumber: [4;13H5 is:
row 4, column 5 for 8 characters
row4, column 13 for 3 characters which gives us Number: 5
Parsing ANSI Code with Python
Using Python, you can parse out the meaningful data from these ANSI codes, allowing you to analyze the terminal output programmatically. I do this fairly often for data extraction and transformation of that data into local databases. Using python in this way involves identifying and processing the ANSI escape sequences to extract and manipulate the actual content.
Using ANSI Code Example (Fig. 1) above, let’s parse out the useful data using python. I will first list out each part of the python code. We begin with:
import re
import sqlite3
NOTE: re and sqlite3 comes pre-installed with Python so there is no need to perform pip install re or pip install sqlite3.
import re: This command imports the re module, which provides support for regular expressions. Regular expressions are a powerful tool for matching patterns in strings, allowing you to search, match, and manipulate text based on specific patterns.
import sqlite3: This command imports the sqlite3 module, which provides an interface to interact with SQLite databases. SQLite is a lightweight, disk-based database that doesn’t require a separate server process, and it allows you to create, read, update, and delete records in a relational database using SQL (Structured Query Language) commands.
# Read the content of the file
with open('data.txt', 'r', encoding='utf-8') as file:  # File that contains raw data
content = file.read()- The
openfunction is called with three arguments:
'data.txt': The name of the file to be opened.'r': The mode in which to open the file.'r'stands for read mode.encoding='utf-8': Specifies the encoding to be used for reading the file.
2. The with statement ensures that the file is closed properly after the block of code inside it is executed.
3. The file.read() method reads the entire content of the file into a string variable content.
4. After this code runs, content will contain all the text from data.txt as a single string, which can then be processed further in the program.
# Define the patterns to capture the additional fields
fields_patterns = {
    'Multimedia?': re.compile(r'\x1b\[5;13H([yn])'),
    'Attendant Vectoring?': re.compile(r'\x1b\[5;41H([yn])'),
    'Meet-me Conf?': re.compile(r'\x1b\[5;60H([yn])'),
    'Lock?': re.compile(r'\x1b\[5;78H([yn])'),
    'Basic?': re.compile(r'\x1b\[6;13H([yn])'),
    'EAS?': re.compile(r'\x1b\[6;22H([yn])'),
    'G3V4 Enhanced?': re.compile(r'\x1b\[6;41H([yn])'),
    'ANI/II-Digits?': re.compile(r'\x1b\[6;60H([yn])'),
    'ASAI Routing?': re.compile(r'\x1b\[6;78H([yn])'),
    'Prompting?': re.compile(r'\x1b\[7;13H([yn])'),
    'LAI?': re.compile(r'\x1b\[7;22H([yn])'),
    'G3V4 Adv Route?': re.compile(r'\x1b\[7;41H([yn])'),
    'CINFO?': re.compile(r'\x1b\[7;52H([yn])'),
    'BSR?': re.compile(r'\x1b\[7;61H([yn])'),
    'Holidays?': re.compile(r'\x1b\[7;75H([yn])'),
    'Variables?': re.compile(r'\x1b\[8;13H([yn])'),
    'Enhanced_3_0?': re.compile(r'\x1b\[8;31H([yn])')
}
fields_patterns = {
- This line starts the definition of the dictionary
fields_patterns.
'Multimedia?': re.compile(r'\x1b\[5;13H([yn])'),
- This line defines a key-value pair in the dictionary. The key is
'Multimedia?', and the value is a compiled regular expression pattern. re.compile(r'\x1b\[5;13H([yn])')compiles a regular expression that matches the escape sequence\x1b[5;13Hfollowed by eitheryorn. This pattern is used to find the value of the'Multimedia?'field in the content.
Similar lines follow for each field:
- Each field name (e.g.,
'Attendant Vectoring?','Meet-me Conf?') is paired with a compiled regular expression pattern. - The patterns are designed to match specific positions in the text where the field values (
yorn) are located.
General compile explanation:
re.compile(...): This function compiles a regular expression pattern into a regex object, which can be used for matching.r'...': Therbefore the string denotes a raw string, which tells Python not to interpret backslashes as escape characters.\x1b\[5;13H: This part of the pattern matches the escape sequence\x1b[5;13H. The\x1brepresents an escape character, and\[5;13Hrepresents the cursor positioning command.([yn]): This part of the pattern captures eitheryornin a group. The parentheses around[yn]create a capturing group, which allows the matched value to be extracted.
# Extract the field values
fields = {}
for field_name, pattern in fields_patterns.items():
    match = pattern.search(content)
    fields[field_name] = match.group(1) if match else 'Not found'
fields = {}
- This line initializes an empty dictionary named
fields. This dictionary will store the extracted field values.
for field_name, pattern in fields_patterns.items():
- This line starts a loop that iterates over each key-value pair in the
fields_patternsdictionary. field_namewill be the name of the field (e.g.,'Multimedia?').patternwill be the corresponding compiled regular expression pattern (e.g.,re.compile(r'\x1b\[5;13H([yn])')).
match = pattern.search(content)
- This line uses the
searchmethod of the regular expression objectpatternto search for a match in thecontent. - If a match is found, the
matchvariable will contain a match object. If no match is found,matchwill beNone.
fields[field_name] = match.group(1) if match else 'Not found'
- This line assigns a value to the
fieldsdictionary for the currentfield_name. - If a match is found (
matchis notNone),match.group(1)extracts the value captured by the first capturing group in the regular expression (theyorn). - If no match is found (
matchisNone), the value'Not found'is assigned to thefieldsdictionary for the currentfield_name.
# Connect to the SQLite database (or create it if it doesn't exist)
conn = sqlite3.connect('yourdatabasename.db')
cursor = conn.cursor()

# Create the table if it doesn't exist
cursor.execute('''
    CREATE TABLE IF NOT EXISTS vectors (
        id INTEGER PRIMARY KEY AUTOINCREMENT,
        multimedia TEXT,
        attendant_vectoring TEXT,
        meet_me_conf TEXT,
        lock TEXT,
        basic TEXT,
        eas TEXT,
        g3v4_enhanced TEXT,
        ani_ii_digits TEXT,
        asai_routing TEXT,
        prompting TEXT,
        lai TEXT,
        g3v4_adv_route TEXT,
        cinfo TEXT,
        bsr TEXT,
        holidays TEXT,
        variables TEXT,
        enhanced_3_0 TEXT
    )
''')

# Insert the data into the database
sql = '''
    INSERT INTO vectors (
        multimedia,
        attendant_vectoring,
        meet_me_conf,
        lock,
        basic,
        eas,
        g3v4_enhanced,
        ani_ii_digits,
        asai_routing,
        prompting,
        lai,
        g3v4_adv_route,
        cinfo,
        bsr,
        holidays,
        variables,
        enhanced_3_0
    ) VALUES (?, ?, ?, ?, ?, ?, ?, ?, ?, ?, ?, ?, ?, ?, ?, ?, ?)
'''
data = (
    fields['Multimedia?'],
    fields['Attendant Vectoring?'],
    fields['Meet-me Conf?'],
    fields['Lock?'],
    fields['Basic?'],
    fields['EAS?'],
    fields['G3V4 Enhanced?'],
    fields['ANI/II-Digits?'],
    fields['ASAI Routing?'],
    fields['Prompting?'],
    fields['LAI?'],
    fields['G3V4 Adv Route?'],
    fields['CINFO?'],
    fields['BSR?'],
    fields['Holidays?'],
    fields['Variables?'],
    fields['Enhanced_3_0?']
)
cursor.execute(sql, data)

# Commit the transaction and close the connection
conn.commit()
conn.close()

print("Data has been successfully uploaded to the database.")
This part of the code is responsible for connecting to a SQLite database, creating a table if it doesn’t already exist, inserting data into the table, and then closing the database connection. Here’s a detailed explanation of each section.
IMPORTANT NOTE: While SQLite will allow you to create fields that begin with a number, such as “3_0_Enhanced,” it is strongly recommended to avoid this practice. Creating field names that start with a number can lead to programming issues later on.
Final code:
import re
import sqlite3

# Read the content of the file
with open('data.txt', 'r', encoding='utf-8') as file:  # File that contains raw data
    content = file.read()

# Define the patterns to capture the additional fields
fields_patterns = {
    'Multimedia?': re.compile(r'\x1b\[5;13H([yn])'),
    'Attendant Vectoring?': re.compile(r'\x1b\[5;41H([yn])'),
    'Meet-me Conf?': re.compile(r'\x1b\[5;60H([yn])'),
    'Lock?': re.compile(r'\x1b\[5;78H([yn])'),
    'Basic?': re.compile(r'\x1b\[6;13H([yn])'),
    'EAS?': re.compile(r'\x1b\[6;22H([yn])'),
    'G3V4 Enhanced?': re.compile(r'\x1b\[6;41H([yn])'),
    'ANI/II-Digits?': re.compile(r'\x1b\[6;60H([yn])'),
    'ASAI Routing?': re.compile(r'\x1b\[6;78H([yn])'),
    'Prompting?': re.compile(r'\x1b\[7;13H([yn])'),
    'LAI?': re.compile(r'\x1b\[7;22H([yn])'),
    'G3V4 Adv Route?': re.compile(r'\x1b\[7;41H([yn])'),
    'CINFO?': re.compile(r'\x1b\[7;52H([yn])'),
    'BSR?': re.compile(r'\x1b\[7;61H([yn])'),
    'Holidays?': re.compile(r'\x1b\[7;75H([yn])'),
    'Variables?': re.compile(r'\x1b\[8;13H([yn])'),
    'Enhanced_3_0?': re.compile(r'\x1b\[8;31H([yn])')
}

# Extract the field values
fields = {}
for field_name, pattern in fields_patterns.items():
    match = pattern.search(content)
    fields[field_name] = match.group(1) if match else 'Not found'

# Connect to the SQLite database (or create it if it doesn't exist)
conn = sqlite3.connect('yourdatabasename.db')
cursor = conn.cursor()

# Create the table if it doesn't exist
cursor.execute('''
    CREATE TABLE IF NOT EXISTS vectors (
        id INTEGER PRIMARY KEY AUTOINCREMENT,
        multimedia TEXT,
        attendant_vectoring TEXT,
        meet_me_conf TEXT,
        lock TEXT,
        basic TEXT,
        eas TEXT,
        g3v4_enhanced TEXT,
        ani_ii_digits TEXT,
        asai_routing TEXT,
        prompting TEXT,
        lai TEXT,
        g3v4_adv_route TEXT,
        cinfo TEXT,
        bsr TEXT,
        holidays TEXT,
        variables TEXT,
        enhanced_3_0 TEXT
    )
''')

# Insert the data into the database
sql = '''
    INSERT INTO vectors (
        multimedia,
        attendant_vectoring,
        meet_me_conf,
        lock,
        basic,
        eas,
        g3v4_enhanced,
        ani_ii_digits,
        asai_routing,
        prompting,
        lai,
        g3v4_adv_route,
        cinfo,
        bsr,
        holidays,
        variables,
        enhanced_3_0
    ) VALUES (?, ?, ?, ?, ?, ?, ?, ?, ?, ?, ?, ?, ?, ?, ?, ?, ?)
'''
data = (
    fields['Multimedia?'],
    fields['Attendant Vectoring?'],
    fields['Meet-me Conf?'],
    fields['Lock?'],
    fields['Basic?'],
    fields['EAS?'],
    fields['G3V4 Enhanced?'],
    fields['ANI/II-Digits?'],
    fields['ASAI Routing?'],
    fields['Prompting?'],
    fields['LAI?'],
    fields['G3V4 Adv Route?'],
    fields['CINFO?'],
    fields['BSR?'],
    fields['Holidays?'],
    fields['Variables?'],
    fields['Enhanced_3_0?']
)
cursor.execute(sql, data)

# Commit the transaction and close the connection
conn.commit()
conn.close()

print("Data has been successfully uploaded to the database.")
Thank you for following along with this tutorial. We hope you found it helpful and informative. If you have any questions, or if you would like to suggest new Python code examples or topics for future tutorials/articles, please feel free to join and comment. Your feedback and suggestions are always welcome!
You can find the same tutorial on Medium.com