A YouTuber recently shared that she had to pause and restart her recording midway because her tweets refreshed and were lost. This highlights the importance of maintaining control over the contextual material in videos, rather than depending on external platforms. If you’re a YouTuber looking to embed tweets on your screen in a controlled environment, Local Tweet Deck (LTD) is an ideal seed solution. LTD lets you display real tweets while giving you complete control over how they appear, ensuring a smoother, more reliable recording process.
LTD uses FastAPI, Jinja2 for templating, and persistent JSON storage. This tool will run locally and allow you to add tweets, annotate them with custom notes, and delete them as needed.
Step 1: Setting Up the Project
Before jumping into the code, let’s set up the virtual environment and install the required dependencies.
Creating a Virtual Environment
To isolate your project and avoid dependency conflicts, it’s a good practice to use a virtual environment. Open your terminal or command prompt and run the following commands:
python -m venv ltd-venvNext, activate the virtual environment:
On Windows:
ltd-venv\Scripts\activateOn Linux:
source ltd-venv/bin/activateNow that the environment is active, install the necessary Python packages:
pip install fastapi jinja2 uvicorn python-multipartThese libraries will allow us to build the FastAPI application, render templates, and handle form submissions.
Step 2: Creating the FastAPI Application
Now, let’s start building the backend of LTD. In the root directory of your project, create a file named main.py and paste the following code:
from fastapi import FastAPI, Form
from fastapi.responses import HTMLResponse
from jinja2 import Template
import uvicorn
import json
import os

app = FastAPI()

# File path for storing tweets
TWEET_FILE = "tweets.json"

# Load existing tweets from file (if any)
def load_tweets():
    if os.path.exists(TWEET_FILE):
        with open(TWEET_FILE, "r") as f:
            return json.load(f)
    return []

# Save tweets to file
def save_tweets():
    with open(TWEET_FILE, "w") as f:
        json.dump(embedded_tweets, f)

# Initialize the embedded_tweets list with the loaded tweets
embedded_tweets = load_tweets()

@app.get("/", response_class=HTMLResponse)
async def tweet_form():
    # Display the tweet embed form with currently embedded tweets
    with open("templates/tweet_form.html") as file_:
        template = Template(file_.read())
    return template.render(tweets=embedded_tweets, enumerate=enumerate)

@app.post("/embed-tweet", response_class=HTMLResponse)
async def embed_tweet(tweet_html: str = Form(...)):
    embedded_tweets.append({"html": tweet_html, "note": None})
    save_tweets()  # Save the tweets after adding
    with open("templates/tweet_form.html") as file_:
        template = Template(file_.read())
    return template.render(tweets=embedded_tweets, enumerate=enumerate)

@app.post("/add-note", response_class=HTMLResponse)
async def add_note(tweet_index: int = Form(...), note: str = Form(...)):
    if 0 <= tweet_index < len(embedded_tweets):
        embedded_tweets[tweet_index]['note'] = note
        save_tweets()  # Save the tweets after adding a note
    with open("templates/tweet_form.html") as file_:
        template = Template(file_.read())
    return template.render(tweets=embedded_tweets, enumerate=enumerate)

@app.post("/delete-tweet", response_class=HTMLResponse)
async def delete_tweet(tweet_index: int = Form(...)):
    if 0 <= tweet_index < len(embedded_tweets):
        embedded_tweets.pop(tweet_index)
        save_tweets()  # Save the tweets after deleting
    with open("templates/tweet_form.html") as file_:
        template = Template(file_.read())
    return template.render(tweets=embedded_tweets, enumerate=enumerate)

if __name__ == "__main__":
    uvicorn.run(app, host="127.0.0.1", port=8000, log_level="info")
What the Code Does
- Storing Tweets: We store embedded tweets and notes in a JSON file (
tweets.json). Tweets are loaded from this file when the server starts, and saved back whenever changes are made. - Routes:
/: Displays the tweet embed form and the list of currently embedded tweets./embed-tweet: Allows users to add a new tweet embed code./add-note: Allows users to add a note to a specific tweet./delete-tweet: Deletes a specific tweet from the list.
Step 3: Creating the HTML Template
Now that the backend is set up, let’s create the HTML form and layout to display the embedded tweets. Inside a new folder called templates, create a file named tweet_form.html and add the following code:
<!DOCTYPE html>
<html lang="en">
<head>
    <meta charset="UTF-8">
    <meta name="viewport" content="width=device-width, initial-scale=1.0">
    <title>Local Tweet Deck</title>
    <style>
        body {
            font-family: Arial, sans-serif;
            margin: 20px;
        }
        .tweet-container {
            border: 1px solid #ddd;
            padding: 20px;
            margin-bottom: 20px;
            background-color: #f9f9f9;
        }
        .embed-form {
            margin-bottom: 40px;
        }
        .embed-form textarea {
            width: 100%;
            height: 100px;
            padding: 10px;
            font-size: 14px;
        }
        .tweet-content {
            margin-top: 10px;
        }
        .tweet-actions {
            display: flex;
            justify-content: space-between;
            margin-bottom: 10px;
        }
        .tweet-actions button {
            margin-right: 10px;
        }
        .tweet-note {
            margin-top: 10px;
            color: #555;
        }
        .note-form {
            display: none;
            margin-top: 10px;
        }
        .note-form textarea {
            width: 100%;
            height: 50px;
            padding: 5px;
        }
    </style>
    <script>
        function toggleNoteForm(index) {
            var form = document.getElementById('note-form-' + index);
            if (form.style.display === 'none' || form.style.display === '') {
                form.style.display = 'block';
            } else {
                form.style.display = 'none';
            }
        }
    </script>
</head>
<body>
<h1>Local Tweet Deck</h1>
<h1>Embed a Tweet</h1>

<form action="/embed-tweet" method="post" class="embed-form">
    <label for="tweet_html">Paste the embed code from Twitter:</label>
    <textarea name="tweet_html" id="tweet_html" required></textarea><br>
    <button type="submit">Embed Tweet</button>
</form>

<h2>Embedded Tweets</h2>

{% for index, tweet in enumerate(tweets) %}
<div class="tweet-container">
    <div class="tweet-actions">
        <button onclick="toggleNoteForm({{ index }})">Add Note</button>
        <form action="/delete-tweet" method="post" style="display: inline;">
            <input type="hidden" name="tweet_index" value="{{ index }}">
            <button type="submit">Delete Tweet</button>
        </form>
    </div>

    <!-- Note Form -->
    <div id="note-form-{{ index }}" class="note-form">
        <form action="/add-note" method="post">
            <input type="hidden" name="tweet_index" value="{{ index }}">
            <textarea name="note" placeholder="Add your note here"></textarea><br>
            <button type="submit">Submit Note</button>
        </form>
    </div>

    <div class="tweet-content">
        {{ tweet['html'] | safe }}
        {% if tweet['note'] %}
        <p class="tweet-note">Note: {{ tweet['note'] }}</p>
        {% endif %}
    </div>
</div>
{% endfor %}

</body>
</html>
Explanation of the Template
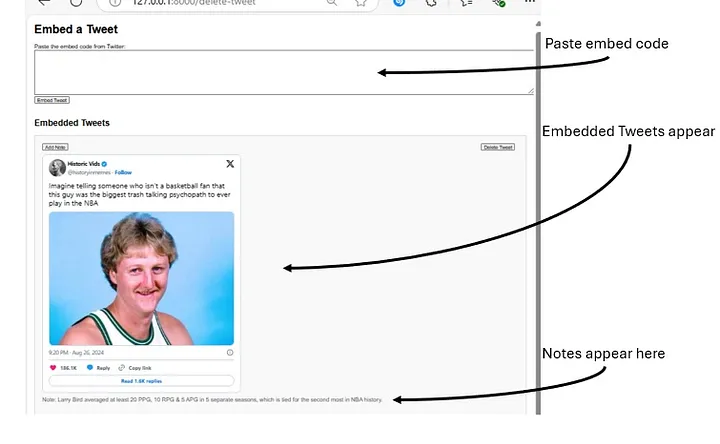
- Users can paste the tweet embed code in the form and press “Embed Tweet” to add a tweet.
- For each embedded tweet, you can add a note (a form will appear when the “Add Note” button is clicked) or delete the tweet entirely.
Step 4: Running the Application
Now that everything is set up, run the application using the following command:
uvicorn main:app --reloadOpen your browser and navigate to http://127.0.0.1:8000 to access your Local Tweet Deck.
Step 5: How to Use LTD
- Find a tweet on x.com (formerly Twitter).
- Select the “Embed post” option under the tweet’s “more” button (three dots).
- Copy the embedded post and paste it into the provided textarea in LTD.
- Press “Embed Tweet” to add it to your local page.
- Use the “Add Note” button to annotate tweets with custom notes that will be displayed alongside the tweet.
- Press “Delete Tweet” to remove a specific tweet from the list.
All tweets are stored in a JSON file, ensuring they persist even after you restart the server.
Final product looks like this:
Thank you for following along with this tutorial. We hope you found it helpful and informative. If you have any questions, or if you would like to suggest new Python code examples or topics for future tutorials/articles, please feel free to join and comment. Your feedback and suggestions are always welcome!
You can find the same tutorial on Medium.com.